 Packaging Shader NetworksPackaging Shader Networks
Internal and External Parameters
Slim appearances can be combined into powerful networks. As Slim networks grow in size, though, they can become more complicated to manage, and when used by some one other than their creator, they can become difficult to understand. We use the term packaging to refer to methods of simplifying a network, optionally preparing it for use by others.
Slim offers several ways to package networks into more accessible entities:
We discuss each of these packaging methods below.
All of these methods of packaging rely on external parameters. External parameters are those which have been designated to be published for use by the RenderMan shader that is generated and compiled by Slim.
External parameters are indicated by the icon beside a parameter label:

This parameter is internal. Its value will be hard-coded into the resulting RenderMan shader.

This parameter is external. Its value will become a parameter of the resulting RenderMan shader, and can be further adjusted after the shader is generated and compiled.
You can toggle whether a parameter is internal or external using the Property Menu to the right of its value.
Slim networks can often be divided into sections (or "subnetworks") that perform a specific function. By bundling these nodes into one, you simplify the whole network. Below we see a relatively simple network in Slim's Graph Editor. In the top region of the graph, fractal nodes combine to drive a spline:
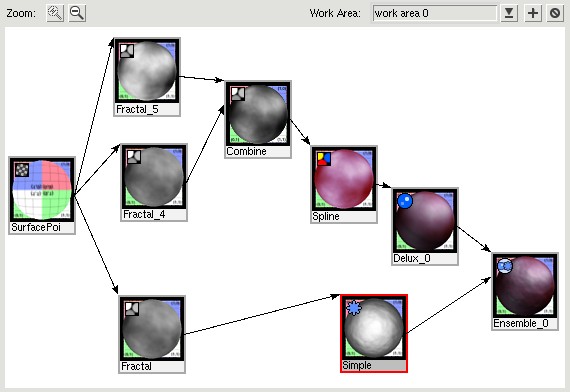
This is a distinct parcel of our network, and it'd be useful to simplify it into one node. If we select the Spline node and create a bundle (from either editor: Appearance » Package » Bundle), we see the following in our graph view:
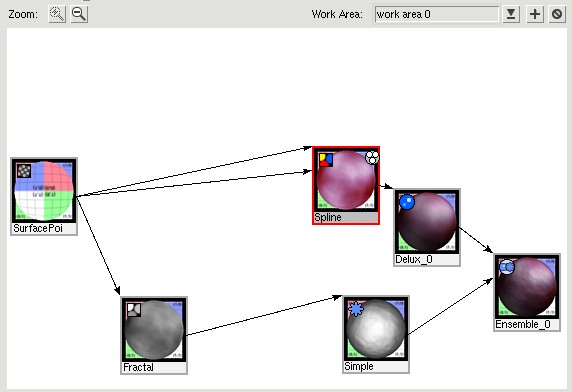
The Spline bundle now contains the nodes in the network that are only used by the Spline appearance (note that the SurfacePoint manifold appearance, shared with Fractal, was not included in the bundle). The contained nodes, while still in the palette, are no longer visible in the Palette or Graph Editors.
The Spline node's bundled state is indicated by the three circumscribed circles in the upper-right corner of the icon. Clicking this icon opens the bundle and reveals its contents, yielding a graph not unlike what we started with. When the icon is clicked again, the bundles contents are again hidden from view.
Below we see the Spline bundle as viewed in the Appearance Editor:
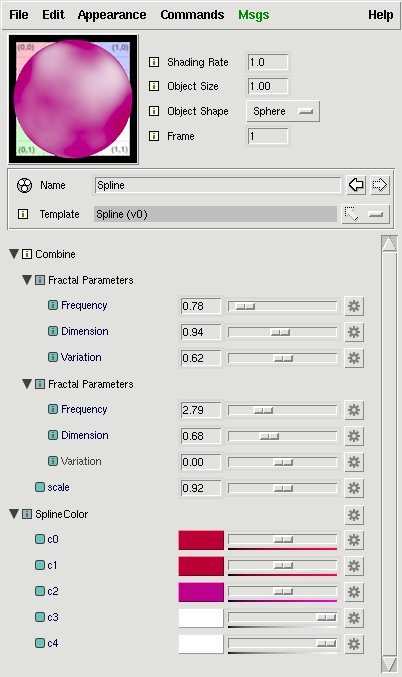
A bundle displays a hierarchy of all external parameters to appearances within the bundle. You can edit this hierarchy, as is detailed in the Appearance Editor documentation.
You can create a bundle at any point in a Slim network. In the example above, the bundle is created at a color Spline node. For supporting types like color and float, a bundle displays the external parameters for nodes that are collected within the bundle only. For attachable types like shadingmodel, though, a bundle will display all external parameters within the network. This feature is useful when used in conjunction with the other methods of packaging: instancing and flattening.
When applying a network to a model or scene, you might find yourself wanting to make small changes for different pieces of geometry. Imagine, for example, a large control panel with several different buttons and displays. You might want to apply the same basic shader to each of these buttons, but slightly change the color, the size of the highlight, the dirtiness, or the glow.
One way to achieve this would be to duplicate the network several times, one for each variation in the shader. While this will work, it has some problems:
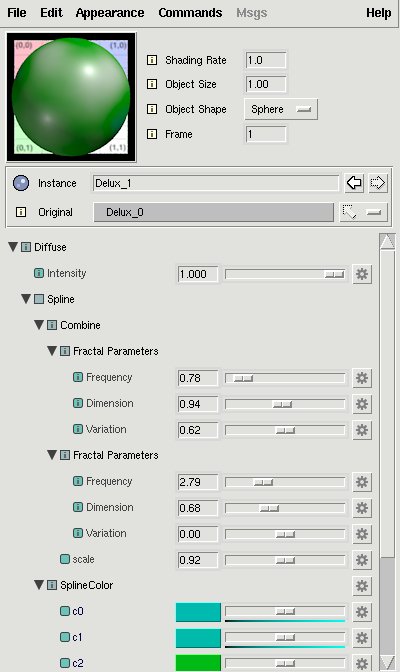
Above we see an instance of the Delux shader shown in previous graphs. The instance displays settings for all of the external parameters in the original Delux network. In this instance, we've left all of the parameters intact but the colors, which we've switched to a blue-green ramp.
After creating the instance (from either editor: Appearance » Instance » Create Instance), we can continue to develop the original network, easily accessed via the button next to the "Original" field in the navigation section. Updates occur whenever the shader is needed for the instance or the original (e.g. when the preview button is pressed). Updates include both internal changes to the shader, and changes to external parameters visible in the instance.
Speaking of external parameters, you may notice that the hierarchy presented in an instance is similar to what was seen in a bundle. This is because the same hierarchy algorithm is used for both. If the original network is bundled, though, any changes made to that hierarchy will appear in the hierarchy of the instance. This allows you to completely customize the appearance of an instance!
Instances work best when the original network is accessible (preferrably in the same palette), since they are able to incorporate changes to the network. Because they are dependent upon the presence of that network, though, they may not be the best solution for deployment.
Flattening a network is more of an export operation. When a network is flattened, a new, independent RenderMan shader is created on disk, along with an accompanying .slim file. The resulting shader can then be copied, imported into other palettes, or even used directly in PRMan without Slim.
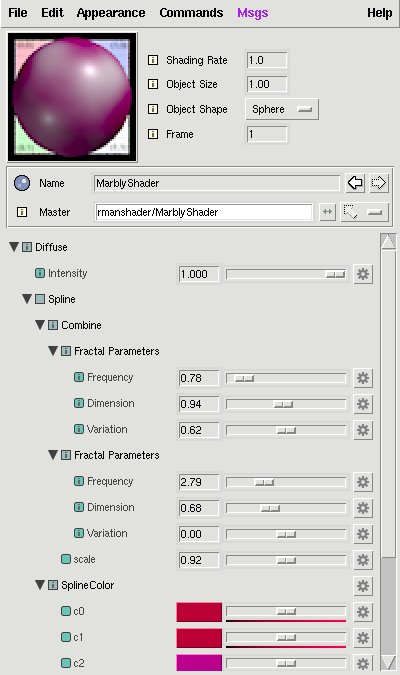
Above is a flattened shader created using the same network as before. You can see that like an instance, a flattened shader presents its parameters in a hierarchical fashion. And like an instance, this hierarchy can be manipulated if the original network is a bundle. If you look to the navigation section, though, you'll note that rather than referring to a Slim network, this appearance refers to an on-disk "Master": rmanshader/MarblyShader.
When flattening a shader (from either editor: Appearance » Package » Flatten...), Slim prompts you for a filename for the exported .slo and .slim files. Slim creates these files, then imports them into the current palette for your inspection or use. The files, however, are completely portable for use elsewhere. You can copy the .slo file and use it in your own PRMan renders, or move the pair into a shared location for importing into future Slim palettes.
Flattened shaders are atomic. You can't connect any Slim functions to their parameters, though you can use TCL expressions to drive them, and you can connect a flattened shader to an Ensemble. Flattened shaders, though, are much lighter-weight though, both when loading into Slim and when rendering through MTOR (since no shader generation or compilation is necessary). See the table in the Shader Design section for further comparison.
When a shader is flattened, a .slim file is created and placed in the same directory as the RenderMan shader (.slo file). This file contains information for presenting the shader within Slim like parameter labels, descriptions, and ranges.
You can edit this file to customize the appearance of a shader imported into a Slim palette. Parameters are arranged in a hierarchy corresponding to what is shown in the interface, and look something like the following:
parameter float Diffuse_Intensity {
    default 1
    range {0 1 .001}
    label Intensity
    description {Intensity of diffuse component}
}
You should not change the paramater name ("Diffuse_Intensity") or
type ("float"). The others, though, are fair game:
For more details, see the documentation of the Slim File Format.
- default
- The default value of the parameter. In this case, it is 1.
- range
- The mininum and maximum values recommended, followed by the precision shown in the editor. In this case, the parameter can be set between 0 and 1, with precision to the thousandths.
- label
- The parameter name is what is used by the shader. The label is what is displayed within Slim. Parameter names must be valid variable names, and must be unique within a shader. Since the label is only used for display, it can contain characters such as spaces and ampersands, and does not need to be unique.
- description
- The description is what is displayed when the user clicks on a parameter icon with an i inside.
You can import a flattened shader into a Slim palette using File » Import Appearance in the Palette Editor. From this menu, you can choose to import any shader on disk using the "Import Appearance..." command. This option is preceded by a series of cascade menus with entries for several "favorites."
The contents of these menus are described in the slim.ini configuration file. You can augment or replace these menus in your own initialization file.
|
Pixar Animation Studios
|